Add an inventory item to Roc Terminal+
Roc Terminal+ web portal
You can save items to your inventory so that you can quickly add them to a sale.
The following table shows the details that you can add to an item:
| Field | Required? | Description |
|---|---|---|
| Item Name | Required | Name of the item. |
| SKU | Optional | Stock keeping unit (SKU) number, which is a unique identifier that you assign to the item. |
| Category | Required | Category of the item. |
| Unit Cost | Optional | Cost of one unit of item in dollars. |
| Description | Required | Description of the item. |
Inventory | Required | Indicates whether you want to track the stock count for the item. Select one of the following options:
|
Qty | Conditional | Number of units you have in stock. You can complete this field only if you select Yes in the Inventory field. |
Status | Required | Indicates whether the item displays in your inventory. Select one of the following options:
|
Pin Item | Optional | Indicates if you want to pin the item to the top of the inventory list. You can pin multiple items. If you pin an item, you must also specify its pinned position in the Pinned Item Order field. |
Pinned Item Order | Conditional | Position of the pinned item in the inventory list. You can complete this field only if you select Pin Item. |
Taxable? | Required | Indicates whether taxes apply to the item. Select one of the following options:
|
Commodity Code | Required | Code that identifies the type of item. If you don’t know the commodity code for your item, you can search it on the United States Census Bureau website. |
| Unit Of Measure | Required | Unit that you use to measure the item and the cost for each unit. |
Add an inventory item
- Log in to https://terminalplus.rocpos.com/login.
- On the side menu, select Settings.
- Select the Product tab.
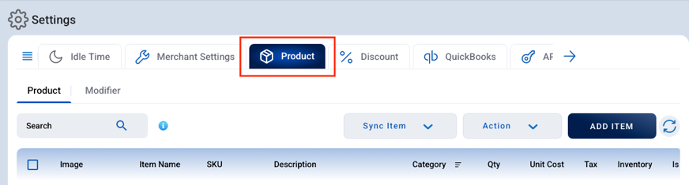
- Select ADD ITEM.
- (Optional) To add an image to the item, select ADD IMAGE, and then select an image to upload. The image must meet the following requirements:
- File format - .jpg, .jpeg, or .png
- File size - 5MB or smaller
- Image dimensions - 150 x 150 pixels
- Enter the item details.
- Select CREATE.
After you add an item, the inventory automatically syncs across your devices and virtual terminals.